> ## Documentation Index
> Fetch the complete documentation index at: https://java.agentscope.io/llms.txt
> Use this file to discover all available pages before exploring further.
# Quickstart
This is preview documentation. The official release is not yet available.
Use a meeting-notes task to create a cloud Agent, publish an API, register a code application and orchestrate multiple Agents.
You need access to a Service console and an account that can create Agents and publish Endpoints. An administrator must configure a working model and Environment. For a new deployment, follow [local installation](/v2/en/service/quickstart) or [production installation](/v2/en/service/kubernetes) first. The cloud Agent below runs in that Service deployment.
## 1. Create a cloud Agent
1. Open **DESIGN → Agents** and create “Notes assistant”.
2. Select **AgentScope Managed** as Runtime. Leave Model empty to use the administrator's default model.
3. Enter the Instructions below, choose an available Environment in Advanced settings, and save.
```text theme={null}
Organize supplied material into tasks, owners, deadlines and open questions.
Separate facts from assumptions. Identify missing information without inventing sources or dates.
```
Start with text-only work. Add knowledge, skills and tools later using the [Managed Agent guide](/v2/en/service/managed-agent).
### Test quickly: start a Chat in the console
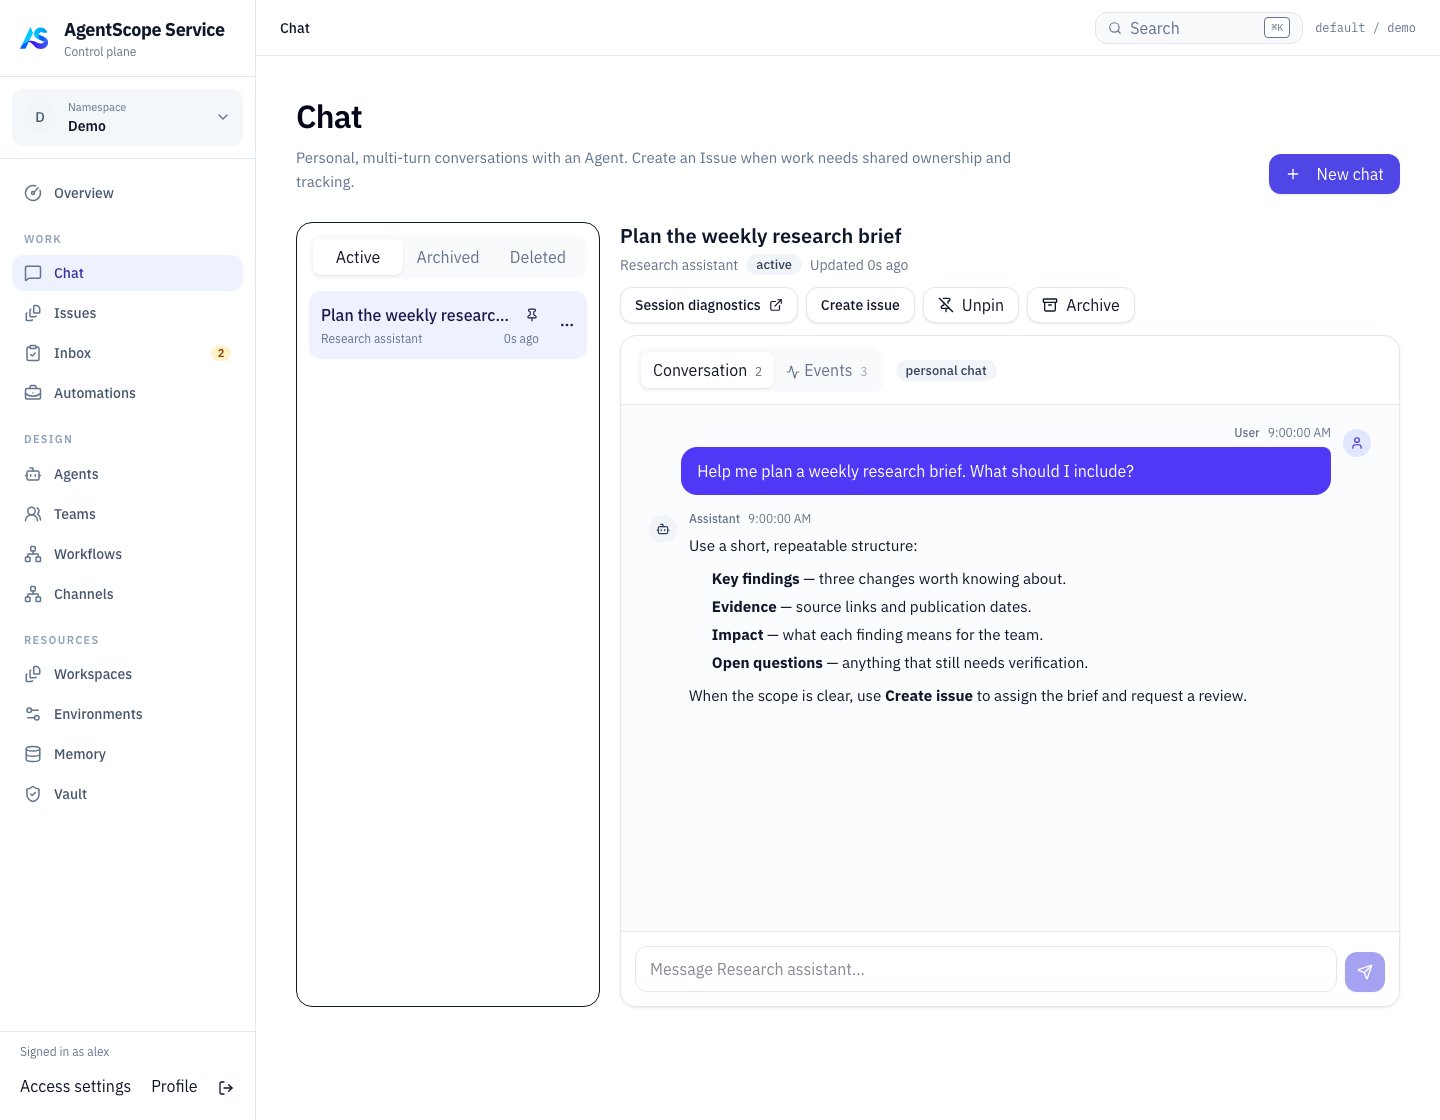
Open **WORK → Chat → New chat**, select “Notes assistant” and send:
```text theme={null}
Turn these meeting notes into action items:
Alex will finish the installation guide by Friday.
Review is planned for Monday; its time is unconfirmed.
```
Check the owner, deadline and unconfirmed review time. Ask “What information is still missing?” Refresh and reopen this Chat to verify both turns remain available.
 ## 2. Publish the Agent as an API service
Return to the Agent's detail page and open **Connections → Published APIs**. Select **New Endpoint** under **Publish as API**:
1. Set Name to “Notes assistant API”, Slug to `notes-assistant`, and Mode to **Conversation**.
2. Select **Create & publish**, confirm `published` status, and save the generated API key.
3. Use **Test API** to verify a request. **API integration examples** provides submission, status and event examples for the release.
Set `BASE_URL` to your Gateway address without a trailing `/` and `ENDPOINT_TOKEN` to the new API key. Submit a conversation turn:
```bash theme={null}
export BASE_URL='https://YOUR_SERVICE_HOST'
export ENDPOINT_TOKEN='YOUR_ENDPOINT_API_KEY'
curl --fail-with-body "$BASE_URL/invoke/v1/endpoints/notes-assistant/conversations" \
-H "X-API-Key: $ENDPOINT_TOKEN" \
-H 'Content-Type: application/json' \
-H 'Idempotency-Key: notes-chat-001' \
--data '{"message":"Organize these notes: Alex finishes the installation guide by Friday. Review is Monday; its time is unconfirmed."}'
```
The API returns `202 Accepted` and invocation identifiers. Example response fields follow; use the actual IDs and status returned:
```json theme={null}
{
"invocationId": "INVOCATION_ID",
"conversationId": "CONVERSATION_ID",
"status": "running",
"statusUrl": "/invoke/v1/conversations/CONVERSATION_ID",
"eventsUrl": "/invoke/v1/conversations/CONVERSATION_ID/events?invocationId=INVOCATION_ID"
}
```
Copy `eventsUrl` and `statusUrl` into the variables below. Submission and SSE subscription are separate steps:
```bash theme={null}
export EVENTS_PATH='PASTE_RETURNED_EVENTS_URL'
export STATUS_PATH='PASTE_RETURNED_STATUS_URL'
curl -N --fail-with-body "$BASE_URL$EVENTS_PATH" \
-H "X-API-Key: $ENDPOINT_TOKEN" \
-H 'Accept: text/event-stream'
curl --fail-with-body "$BASE_URL$STATUS_PATH" \
-H "X-API-Key: $ENDPOINT_TOKEN"
```
These commands assume relative URLs; use absolute returned URLs directly. Preserve the `invocationId` query parameter. Send subsequent messages to `/invoke/v1/conversations/{conversationId}/turns` with a new Idempotency-Key. Reuse the original key and content only when retrying the same submission.
Your console Agent is now callable by applications. See [Endpoints](/v2/en/service/endpoints) for contracts, authentication and error handling.
## 3. Register an Agent developed with AgentScope
Keep an existing AgentScope Java application running in its own process and register it as an **External Agent**. This example uses HTTP registration with a standard Service deployment.
Add the extension dependency. Set `agentscope.version` to a published SDK version matching your application:
```xml theme={null}
io.agentscope
agentscope-extensions-aistio
${agentscope.version}
```
Prepare these deployment environment variables:
| Variable | Value |
| - | - |
| `AISTIO_CONTROL_HTTP` | Service HTTP registration address reachable from the application |
| `AISTIO_BOOTSTRAP_TOKEN` | Administrator-provided trusted workload/bootstrap credential, distinct from the Endpoint API key |
| `AISTIO_TENANT` / `AISTIO_NAMESPACE` | Registration scope for the application |
| `AISTIO_INSTANCE_KEY` | Stable replica identity; use a different value for each replica |
| `AGENT_CONTRACT_URL` | Application URL reachable from the control plane, such as `http://report-agent:18090` |
Add this fragment after initializing your Agent; `agent` is the Agent object you already created:
```java theme={null}
import io.agentscope.extensions.aistio.Aistio;
import io.agentscope.extensions.aistio.AistioConfig;
import io.agentscope.extensions.aistio.SessionBridge;
SessionBridge bridge = Aistio.instrument(agent,
AistioConfig.builder("report-service")
.controlPlaneHttp(System.getenv("AISTIO_CONTROL_HTTP"))
.internalToken(System.getenv("AISTIO_BOOTSTRAP_TOKEN"))
.tenant(System.getenv("AISTIO_TENANT"))
.namespace(System.getenv("AISTIO_NAMESPACE"))
.instanceKey(System.getenv("AISTIO_INSTANCE_KEY"))
.contractHttpPort(18090)
.publicBaseUrl(System.getenv("AGENT_CONTRACT_URL"))
.startHttpRegister(true)
.startGrpc(false)
.build());
// Call bridge.close() when the application shuts down.
```
Start the application and confirm `report-service` appears in **DESIGN → Agents**. Inspect its instance and contract address. Run a conversation in the application, then check the Session information exposed by the adapter. Both application-to-Service and control-plane-to-application connectivity are required.
This registers the application and exposes its Session contract. Issue/Team dispatch additionally requires a task execution entry such as `AgentTaskStarter`; this fragment does not automatically provide task dispatch or live event streaming. See [External Agent](/v2/en/service/external-agent) for Python integration and ASDP deployment requirements. For the next step, start with verified Managed Agents, then add task-capable External or Hosted members individually.
## 4. Orchestrate Agents together
Use a Team for dynamic collaboration. Keep “Notes assistant” and create a Managed “Review assistant” using step 1. Give it these Instructions: “Check that the supplied material supports every conclusion. Identify missing owners, deadlines and unresolved details.”
Create “Meeting team” in **DESIGN → Teams**. Select “Notes assistant” as Leader Agent and add “Review assistant” under Additional members. Set the coordination instructions:
```text theme={null}
The Leader drafts action items, then delegates a fact and completeness check to Review assistant.
The reviewer returns corrections. The Leader revises and delivers one consolidated list.
Mark unsupported details as open questions. After members finish their tasks, the Leader summarizes and completes the team work.
```
Save and check readiness. For fixed steps such as “Draft → Approval → Summary”, use a [Workflow](/v2/en/service/workflows): configure nodes and dependencies, validate, and publish a revision before exposing or running it.
### Publish a standard Agent service with the same SSE subscription pattern
Under the Team's **Connections → Publish as API → New Endpoint**, create `meeting-team`, select **Create & publish**, and save this Endpoint's own API key. Teams use **Job** mode. For a Workflow, first publish a revision and expose that revision as a Job Endpoint.
```bash theme={null}
export ENDPOINT_TOKEN='YOUR_TEAM_ENDPOINT_API_KEY'
curl --fail-with-body "$BASE_URL/invoke/v1/endpoints/meeting-team/jobs" \
-H "X-API-Key: $ENDPOINT_TOKEN" \
-H 'Content-Type: application/json' \
-H 'Idempotency-Key: meeting-team-001' \
--data '{"title":"Organize meeting actions","description":"Alex finishes the installation guide by Friday. Review is Monday; its time is unconfirmed. Draft and review one consolidated action list.","input":{}}'
```
As with the individual Agent, submit a request, subscribe to the returned `eventsUrl` using `text/event-stream`, and query `statusUrl`. Reuse the SSE commands from step 2 with the current URLs and Team API key.
**The shared integration pattern is Endpoint authentication, request submission and SSE subscription.** Conversations stream turn events; Jobs stream orchestration events. Their request bodies, event contents and result semantics differ. To use the same Job contract for an individual Agent and a Team/Workflow, publish the individual Agent in Job mode too.
When a Job reaches `completed`, read `invocation.result` in the status response. Handle `failed`, `cancelled` and `timed_out` as unsuccessful outcomes. `202 Accepted` only acknowledges submission; after an SSE disconnect, query status to determine execution progress.
### Handle work through console Issues
1. Create “Organize meeting actions” in **WORK → Issues**. Include the notes and require a list of tasks, owners, deadlines and open questions.
2. Assign “Meeting team”, review Sharing, and submit the work. You can also start from Chat's **Create issue** and select the Team.
3. Follow discussion, Task map and Executions. Check that the Leader delegates review, the member returns findings, and the Leader consolidates them. Read the actual comments and Artifacts.
4. For human-review work, open **WORK → Inbox → Review result** when the Issue reaches **In review**. Choose **Accept result** when satisfied, or **Request changes** with the missing details.
If execution does not start, check Team readiness and member runtimes. If members finish but the Team remains active, inspect Leader aggregation and coordination state. Continue with [Team collaboration](/v2/en/service/team-collaboration) and the [Issue guide](/v2/en/service/issues).
This documentation is built and hosted on [Mintlify](https://mintlify.com), a developer documentation platform.
## 2. Publish the Agent as an API service
Return to the Agent's detail page and open **Connections → Published APIs**. Select **New Endpoint** under **Publish as API**:
1. Set Name to “Notes assistant API”, Slug to `notes-assistant`, and Mode to **Conversation**.
2. Select **Create & publish**, confirm `published` status, and save the generated API key.
3. Use **Test API** to verify a request. **API integration examples** provides submission, status and event examples for the release.
Set `BASE_URL` to your Gateway address without a trailing `/` and `ENDPOINT_TOKEN` to the new API key. Submit a conversation turn:
```bash theme={null}
export BASE_URL='https://YOUR_SERVICE_HOST'
export ENDPOINT_TOKEN='YOUR_ENDPOINT_API_KEY'
curl --fail-with-body "$BASE_URL/invoke/v1/endpoints/notes-assistant/conversations" \
-H "X-API-Key: $ENDPOINT_TOKEN" \
-H 'Content-Type: application/json' \
-H 'Idempotency-Key: notes-chat-001' \
--data '{"message":"Organize these notes: Alex finishes the installation guide by Friday. Review is Monday; its time is unconfirmed."}'
```
The API returns `202 Accepted` and invocation identifiers. Example response fields follow; use the actual IDs and status returned:
```json theme={null}
{
"invocationId": "INVOCATION_ID",
"conversationId": "CONVERSATION_ID",
"status": "running",
"statusUrl": "/invoke/v1/conversations/CONVERSATION_ID",
"eventsUrl": "/invoke/v1/conversations/CONVERSATION_ID/events?invocationId=INVOCATION_ID"
}
```
Copy `eventsUrl` and `statusUrl` into the variables below. Submission and SSE subscription are separate steps:
```bash theme={null}
export EVENTS_PATH='PASTE_RETURNED_EVENTS_URL'
export STATUS_PATH='PASTE_RETURNED_STATUS_URL'
curl -N --fail-with-body "$BASE_URL$EVENTS_PATH" \
-H "X-API-Key: $ENDPOINT_TOKEN" \
-H 'Accept: text/event-stream'
curl --fail-with-body "$BASE_URL$STATUS_PATH" \
-H "X-API-Key: $ENDPOINT_TOKEN"
```
These commands assume relative URLs; use absolute returned URLs directly. Preserve the `invocationId` query parameter. Send subsequent messages to `/invoke/v1/conversations/{conversationId}/turns` with a new Idempotency-Key. Reuse the original key and content only when retrying the same submission.
Your console Agent is now callable by applications. See [Endpoints](/v2/en/service/endpoints) for contracts, authentication and error handling.
## 3. Register an Agent developed with AgentScope
Keep an existing AgentScope Java application running in its own process and register it as an **External Agent**. This example uses HTTP registration with a standard Service deployment.
Add the extension dependency. Set `agentscope.version` to a published SDK version matching your application:
```xml theme={null}
io.agentscope
agentscope-extensions-aistio
${agentscope.version}
```
Prepare these deployment environment variables:
| Variable | Value |
| - | - |
| `AISTIO_CONTROL_HTTP` | Service HTTP registration address reachable from the application |
| `AISTIO_BOOTSTRAP_TOKEN` | Administrator-provided trusted workload/bootstrap credential, distinct from the Endpoint API key |
| `AISTIO_TENANT` / `AISTIO_NAMESPACE` | Registration scope for the application |
| `AISTIO_INSTANCE_KEY` | Stable replica identity; use a different value for each replica |
| `AGENT_CONTRACT_URL` | Application URL reachable from the control plane, such as `http://report-agent:18090` |
Add this fragment after initializing your Agent; `agent` is the Agent object you already created:
```java theme={null}
import io.agentscope.extensions.aistio.Aistio;
import io.agentscope.extensions.aistio.AistioConfig;
import io.agentscope.extensions.aistio.SessionBridge;
SessionBridge bridge = Aistio.instrument(agent,
AistioConfig.builder("report-service")
.controlPlaneHttp(System.getenv("AISTIO_CONTROL_HTTP"))
.internalToken(System.getenv("AISTIO_BOOTSTRAP_TOKEN"))
.tenant(System.getenv("AISTIO_TENANT"))
.namespace(System.getenv("AISTIO_NAMESPACE"))
.instanceKey(System.getenv("AISTIO_INSTANCE_KEY"))
.contractHttpPort(18090)
.publicBaseUrl(System.getenv("AGENT_CONTRACT_URL"))
.startHttpRegister(true)
.startGrpc(false)
.build());
// Call bridge.close() when the application shuts down.
```
Start the application and confirm `report-service` appears in **DESIGN → Agents**. Inspect its instance and contract address. Run a conversation in the application, then check the Session information exposed by the adapter. Both application-to-Service and control-plane-to-application connectivity are required.
This registers the application and exposes its Session contract. Issue/Team dispatch additionally requires a task execution entry such as `AgentTaskStarter`; this fragment does not automatically provide task dispatch or live event streaming. See [External Agent](/v2/en/service/external-agent) for Python integration and ASDP deployment requirements. For the next step, start with verified Managed Agents, then add task-capable External or Hosted members individually.
## 4. Orchestrate Agents together
Use a Team for dynamic collaboration. Keep “Notes assistant” and create a Managed “Review assistant” using step 1. Give it these Instructions: “Check that the supplied material supports every conclusion. Identify missing owners, deadlines and unresolved details.”
Create “Meeting team” in **DESIGN → Teams**. Select “Notes assistant” as Leader Agent and add “Review assistant” under Additional members. Set the coordination instructions:
```text theme={null}
The Leader drafts action items, then delegates a fact and completeness check to Review assistant.
The reviewer returns corrections. The Leader revises and delivers one consolidated list.
Mark unsupported details as open questions. After members finish their tasks, the Leader summarizes and completes the team work.
```
Save and check readiness. For fixed steps such as “Draft → Approval → Summary”, use a [Workflow](/v2/en/service/workflows): configure nodes and dependencies, validate, and publish a revision before exposing or running it.
### Publish a standard Agent service with the same SSE subscription pattern
Under the Team's **Connections → Publish as API → New Endpoint**, create `meeting-team`, select **Create & publish**, and save this Endpoint's own API key. Teams use **Job** mode. For a Workflow, first publish a revision and expose that revision as a Job Endpoint.
```bash theme={null}
export ENDPOINT_TOKEN='YOUR_TEAM_ENDPOINT_API_KEY'
curl --fail-with-body "$BASE_URL/invoke/v1/endpoints/meeting-team/jobs" \
-H "X-API-Key: $ENDPOINT_TOKEN" \
-H 'Content-Type: application/json' \
-H 'Idempotency-Key: meeting-team-001' \
--data '{"title":"Organize meeting actions","description":"Alex finishes the installation guide by Friday. Review is Monday; its time is unconfirmed. Draft and review one consolidated action list.","input":{}}'
```
As with the individual Agent, submit a request, subscribe to the returned `eventsUrl` using `text/event-stream`, and query `statusUrl`. Reuse the SSE commands from step 2 with the current URLs and Team API key.
**The shared integration pattern is Endpoint authentication, request submission and SSE subscription.** Conversations stream turn events; Jobs stream orchestration events. Their request bodies, event contents and result semantics differ. To use the same Job contract for an individual Agent and a Team/Workflow, publish the individual Agent in Job mode too.
When a Job reaches `completed`, read `invocation.result` in the status response. Handle `failed`, `cancelled` and `timed_out` as unsuccessful outcomes. `202 Accepted` only acknowledges submission; after an SSE disconnect, query status to determine execution progress.
### Handle work through console Issues
1. Create “Organize meeting actions” in **WORK → Issues**. Include the notes and require a list of tasks, owners, deadlines and open questions.
2. Assign “Meeting team”, review Sharing, and submit the work. You can also start from Chat's **Create issue** and select the Team.
3. Follow discussion, Task map and Executions. Check that the Leader delegates review, the member returns findings, and the Leader consolidates them. Read the actual comments and Artifacts.
4. For human-review work, open **WORK → Inbox → Review result** when the Issue reaches **In review**. Choose **Accept result** when satisfied, or **Request changes** with the missing details.
If execution does not start, check Team readiness and member runtimes. If members finish but the Team remains active, inspect Leader aggregation and coordination state. Continue with [Team collaboration](/v2/en/service/team-collaboration) and the [Issue guide](/v2/en/service/issues).
This documentation is built and hosted on [Mintlify](https://mintlify.com), a developer documentation platform.